|
|


 03-13-2007, 10:34 AM
Okay, so you want to install an Aisin-Warner AW4 transmission into your OBDII ZJ, but have no idea about how to do it? The following is my writeup of the part list including the part numbers where needed as well as step by step installation steps. (Part numbers from dealership surrounded by asterisk's)
Parts list:
1X AW4 (Must be a 23 spline, found in ~90 up XJ's behind the 4.0, as well as select ZJ's in early 93)
1X Torque converter from an aw4
1X Flex plate from an aw4
1X Dustshield from an aw4 *53005907 AND 53004908*
1X TCM from same year XJ
3X connectors for TCM (there are two - one gray and one black - that connect to the body of the transmission and one that connects to the TCM)
4X Torque converter bolts (flex plate bolts are the same for both setups) *34202497*
1X AW4 shifter cable bracket *53007746*
1X AW4 Shifter cable *5207 8452*
1X AW4 Shifter bezel *55033646
1X Aw4 floor shifter for a 93 ZJ with the AW4 *53007749*
1X Tcase shifter bracket on the Transmission body *52077509* (I ended up not using this, I went with a Novak shifter kit for the 231 instead.
1X Cross member from a 93-95 ZJ (be sure to get the bolt that holds the mount onto it)
1X Cross member trans mount *52018857* (I bought from Advanced Auto PN - 621049)
1X Crank Position sensor (This one is tricky, you need to buy one out of an XJ, but you need to buy one out of the same year vehichle that you have. I have a 96, so I bought one from a 96 XJ with an Advance Auto part number of AL2017. This is due to the connectors, for some reason they changed them from year to year, but kept them the same across the board for the ZJ and XJ at least in 1996)
Assorted fittings for the cooler lines - I used the stock lines that came with the AW4 and spliced in soft lines
I installed an auxillary cooler in line after the stock cooler on the radiator - This isn't necessary but heat is the easiest way to kill a transmission
Driveshafts - I am using a driveshaft that is off a zj with the 42re and the 242. I tried to use a front driveshaft of a zj with the 42re and the 242, and it was too long; even after compressing it all the way, it couldn't even fit between the yokes.
Parts to reuse from your 42RE:
Flex plate bolts and spacer
Starter
Some bellhousing bolts, but you're going to have to buy some shorter bolts or get the ones off the aw4 equipped vehicle.
Crossmember bolts to "frame" rails
Procedure:
Removing the 42re
-This is a pretty straight forward process, so I'm not going to go into detail. I had no idea what I was doing and I still was able to do it really easily. A couple basic steps though, drop the back end of the transmission then remove all the connections off the transmission. Then unbolt the bellhousing including the starter and all of the bolts holding on the dust shield. You should be able to then rotate the flex plate to remove the 4 torque converter bolts. If everything is out, you should be able to rock the transmission off the back of the block, but be careful it falls off a jack easily.
Installing the aw4
-Everything should be out of the way and ready to install now.
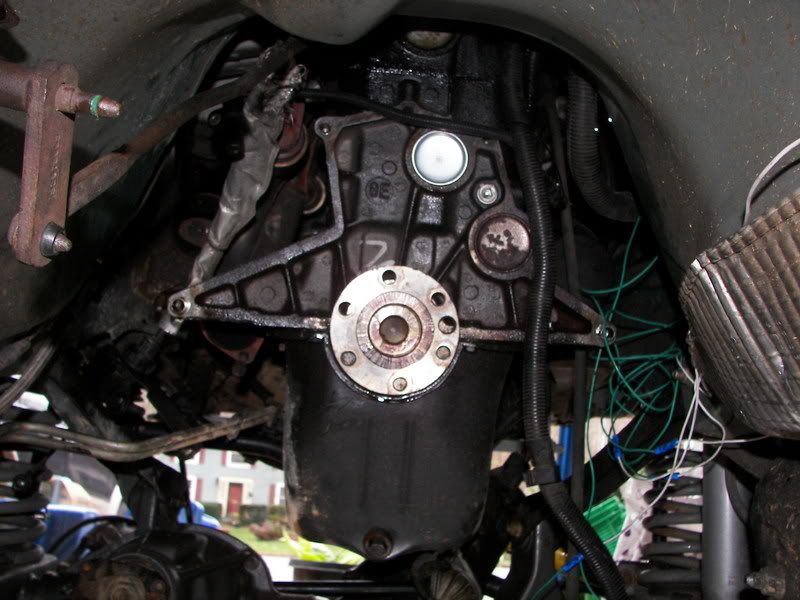
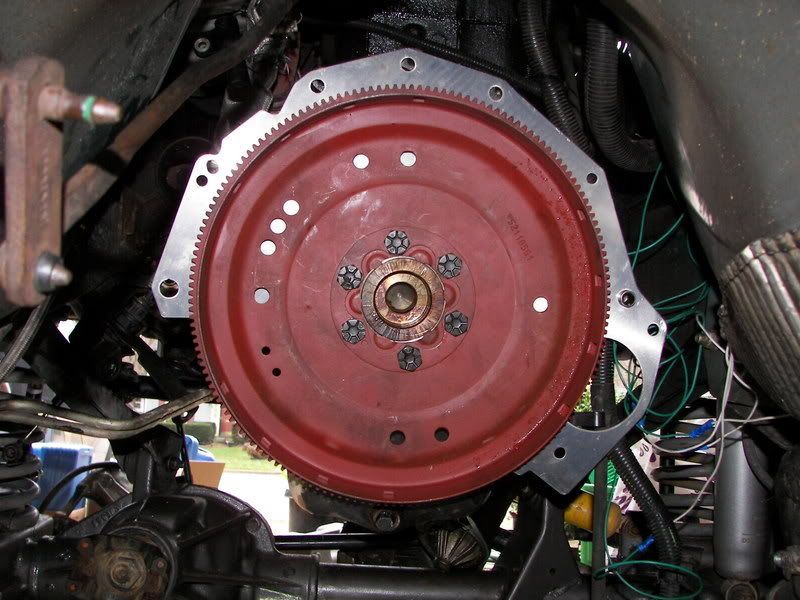
-Place the top portion of the dust shield on the back of the block. It aligns itself on pegs on either side of the block. Then install the flexplate and torque to spec. You're going to have to spin the flex plate around to line it up correctly because the bolt holes aren't concentric on the crank. Don't forget to install the spacer on the transmission side of the flex plate.
-Install the torque converter onto the input shaft of the transmission. Be sure to rotate it at least 90 degrees off vertical in both directions while pushing aftward. This is to ensure that the converter seats on both sets of splines on the input shaft.
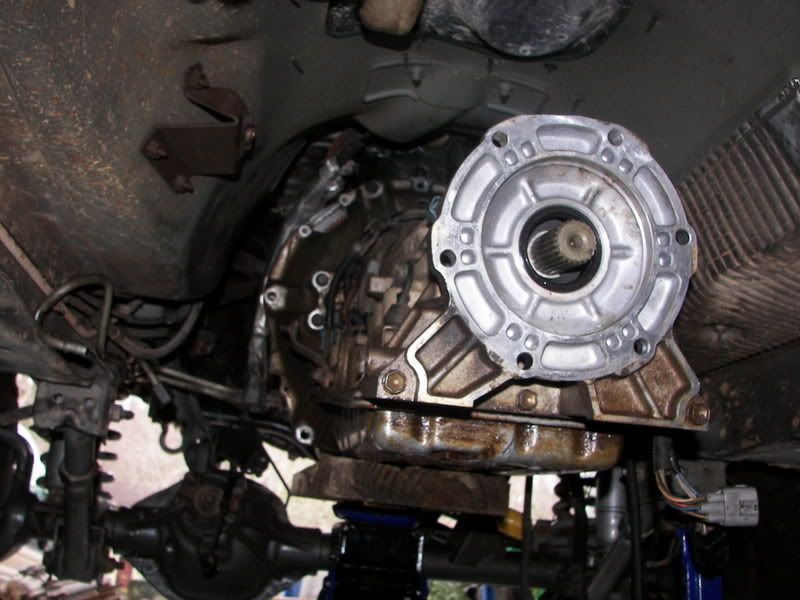
-At this point, you're really ready to put the transmission onto the back of the block. Get it under the jeep and jack it up high enough, then using the aforementioned pegs on the back of the block, line up the transmission and bolt it on. Be careful with this step. You shouldn't force it to mate up with the back of the block. If it is done correctly, it will easily go in. One tip about the torque converter bolts - install one but don't tighten it much. Then rotate the flex plate enough to get the opposite bolt in, then just work your way around to all the bolts, tightening them in increments. I tightened the first bolt too much and I couldn't spin the flex plate at all because the input shaft was at an awkward angle I guess. (SIDE NOTE - You can see where the bracket for the shifter cable goes in the following picture, it is just to the left of the center of the picture where there are two shiny spots with bolts in the middle of them on the backside of the bellhousing)
-Bolt the lower portion of the dust shield onto the bellhousing. Take care of little things at this point such as reinstall the starter onto the tranny. Also run the lines. I cut the stock lines for the AW4 and then used a flaring tool in order to run soft line. I used fuel pressure line.
-Using the pre-95 crossmember and the 93 ZJ mount, mount the rear of the transmission. Reinstall the Tcase.
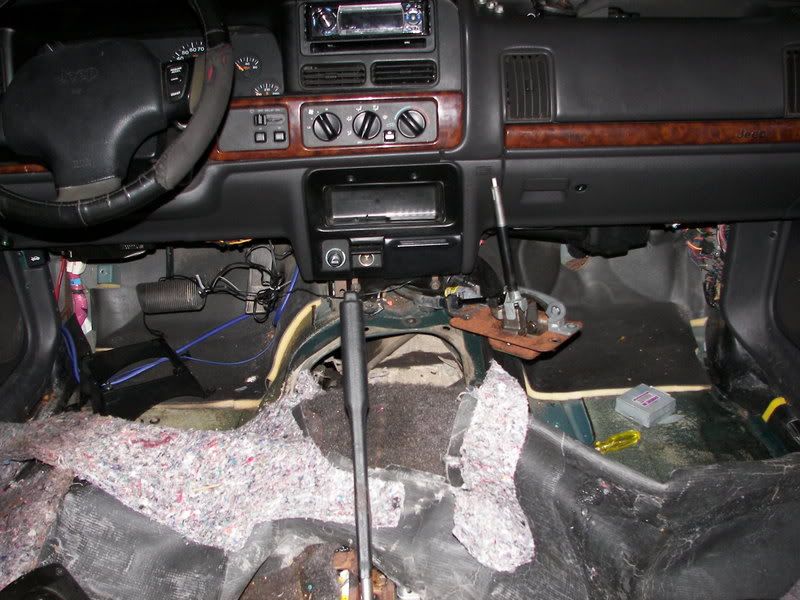
-Now for the interior and the shifter linkages. For the floor shifter, you have to use the one that shifts the aw4 because the gears are in different positions versus the 42re. You also have to use the aw4 shifter cable that goes between the gear selector and the gear selector on the body of the transmission. It may not make sense as to why you have to do this, but it's because the cable that actually moves within the shielding is a slightly different length. This picture shows the interior completely torn apart. This was because in order to install the 4wd linkages (I did this transmission swap to convert my ZJ into 4wd) I had to replace the pan that the gear selectors bolt to in order to mount the 231 handle. You won't have to remove the carpet to just replace the shifter and it's cable, but it would make it easier for the cable portion. I replaced the cable after I had already put the carpet back, so I ended up just cutting the carpet right along the shifter cable (~4" of carpet) and it made it very easy to R&R the cable. To remove the shifter handle you have to just pull really hard on it, but be careful when doing so (look at the last picture in the next set).

 03-13-2007, 10:35 AM
Wiring
Alright, now this part of the swap I can't take credit for, although I have modified it ever so slightly to work with the ZJ. The following is copied DIRECTLY from Stu Olsen's Jeep site located at http://www.stu-offroad.com/index.asp.
For the GRAY 8 prong connector from the Transmission body -
Pin 1 TRS 1-2 Sense - This is a violet with white stripe wire. It needs to connect to Pin 21 on the TCM plug. (Also known as TRS T42 sense). It's purpose is to apply 12 volts to pin 21 on the TCM letting the TCM know that the shifter is in the 1-2 range.
Pin 2 TRS 3 Sense - This is a violet wire. It needs to connect to Pin 9 on the TCM plug. It's purpose is to apply 12 volts to pin 9 on the TCM telling the TCM that the shifter is in the 3 range.
Pin 3 Fused Ignition Switch Output (Run-Start) - This is a white wire. When you turn on the key to the run or start mode this sends power to the TRS. The TRS then uses this power to send signals to the TCM indicating what range the shifter is in. This will tie into the wire bundle coming out of the TJ PCM on connector 1 pin A2.
Pin 4 TRS Overdrive Sense - This is a light green with black stripe wire. It needs to connect to Pin 22 on the TCM plug. It's purpose is to apply 12 volts to pin 22 on the TCM telling the TCM that the shifter is in the OD range.
Pin 5 (Not used)
Pin 6 TRS Reverse Sense - This is a brown with light green stripe wire. It needs to connect to Pin 18 on the TCM plug. It's purpose is to apply 12 volts to pin 18 on the TCM telling the TCM that the shifter is in the reverse range. (Also known as Back Up Lamp Feed)
Pin 7 Park/Neutral Position Switch Sense - This is a black with white stripe wire. It's purpose is to ground the Park/Neutral circuit on the TJ harness when you shift into Park or Neutral so that the starter relay can be engaged which in turn allows the motor to be started. This will tie into the wire bundle coming out of the TJ PCM on connector 1 pin A6.
Pin 8 Ground - This is the ground necessary to complete the Park/Neutral circuit. It will tie into the wire bundle coming out of the TJ PCM on connector 1 pin 31 or 32.
BLACK 8 prong from the transmission body -
Pin 1 Input Speed Sensor Signal - This is a red with black stripe wire. It needs to connect to Pin 2 on the TCM plug. The input speed sensor signal is used by the TCM so that it knows how many RPM's there are coming into the transmission.
Pin 2 Transmission Solenoid B - This is an orange with white stripe wire. It needs to connect to Pin 13 on the TCM plug. The solenoids are used by the TCM to shift the transmission.
Pin 3 Transmission Solenoid A - This is a white wire. It needs to connect to Pin 12 on the TCM plug. The solenoids are used by the TCM to shift the transmission.
Pin 4 Transmission Solenoid C (Lockup) - This is a dark blue with white stripe wire. It needs to connect to Pin 11 on the TCM connector. The TCM uses this solenoid to engage and disengage the lockup.
Pin 5 Input Speed Sensor Ground - This is a violet with light green stripe. It needs to connect to Pin 1 on the TCM plug. It completes input speed sensor circuit.
Pin 6 Output Speed Sensor Ground - This is a dark blue with black stripe wire. It needs to connect to Pin 3 on the TCM plug. It completes the output speed sensor circuit.
Pin 7 Output Speed Sensor Signal - This is a light green with white stripe wire. It needs to connect to Pin 4 on the TCM plug. The output speed sensor signal is used by the TCM so that it knows how many RPM's there are coming out of the transmission.
Pin 8 (Not used)
BLACK 26 prong connector to TCM
Pin 1 Input Speed Sensor Ground - This is a violet with light green stripe. It needs to connect to Pin 5 on the black 8 way plug. It completes input speed sensor circuit
Pin 2 Input Speed Sensor Signal - This is a red with black stripe wire. It needs to connect to Pin 1 on the black 8 way plug. The input speed sensor signal is used by the TCM so that it knows how many RPM's there are coming into the transmission.
Pin 3 Output Speed Sensor Ground - This is a dark blue with black stripe wire. It needs to connect to Pin 6 on the black 8 way plug. It completes the output speed sensor circuit.
Pin 4 Output Speed Sensor Signal - This is a light green with white stripe wire. It needs to connect to Pin 7 on the black 8 way plug. The output speed sensor signal is used by the TCM so that it knows how many RPM's there are coming out of the transmission.
Pin 5 (Not used)
Pin 6 CCD BUS (-) (NOT USED!)
Pin 7 CCD BUS (+) (NOT USED!)
Pin 8 (Not used)
Pin 9 TRS T3 Sense (TRS 3 Sense) - This is a violet wire. It needs to connect to Pin 2 on the gray 8 way plug. It's purpose is to apply 12 volts to pin 9 on the TCM telling the TCM that the shifter is in the 3 range.
Pin 10 (Not used)
Pin 11 Transmission Solenoid C (Lockup) - This is a dark blue with white stripe wire. It needs to connect to Pin 4 on the black 8 way plug. The TCM uses this solenoid to engage and disengage the lockup.
Pin 12 Transmission Solenoid A - This is a white wire. It needs to connect to Pin 3 on the black 8 way plug. The solenoids are used by the TCM to shift the transmission.
Pin 13 Transmission Solenoid B - This is an orange with white stripe wire. It needs to connect to Pin 2 on the black 8 way plug. The solenoids are used by the TCM to shift the transmission.
Pin 14 (Not used)
Pin 15 (Not used)
Pin 16 Sensor Return (Sensor Ground) - This is a brown with yellow stripe wire. This will tie into the wire bundle coming out of the TJ PCM on connector 1 pin A4. When we pull sensor signals off the TJ harness we need to send to signal ground back to the TJ PCM sensor return. This completes the circuit the TCM needs to get signals from the TJ throttle position sensor and brake switch sense circuits.
Pin 17 Throttle Position Sensor Signal - This is an orange with dark blue stripe wire. This will tie into the wire bundle coming out of the TJ PCM on connector 1 pin A23. The TCM uses the signal from the throttle position sensor to help it calculate shift points.
Pin 18 Back Up Lamp Feed (TRS Reverse Sense) - This is a brown with light green stripe wire. It needs to connect to Pin 6 on the gray 8 way plug. It's purpose is to apply 12 volts to pin 18 on the TCM telling the TCM that the shifter is in the reverse range.
Pin 19 (Not used)
Pin 20 (Not used)
Pin 21 T42 Sense (TRS 1-2 Sense) - This is a violet with white stripe wire. It needs to connect to Pin 1 on the gray 8 way plug. It's purpose is to apply 12 volts to pin 21 on the TCM letting the TCM know that the shifter is in the 1-2 range.
Pin 22 TRS T1 Sense (TRS Overdrive Sense) - This is a light green with black stripe wire. It needs to connect to Pin 4 on the gray 8 way plug. It's purpose is to apply 12 volts to pin 22 on the TCM telling the TCM that the shifter is in the OD range.
Pin 23 Brake Switch Sense - This is a white with pink stripe wire. This will tie into the wire bundle coming out of the TJ PCM on connector 3 pin C24. This allows the TCM to know when the brakes are being applied.
Pin 24 Ground - This is a black with tan strip wire. This will tie into the wire bundle coming out of the TJ PCM on connector 1 pin A31 or A32. Provides a ground for the TCM.
Pin 25 Fused B (+) - This is a pink 20 gauge wire. Rather than tear apart the power distribution center I chose to run this straight to the battery positive terminal. You will want to use an inline 15A fuse. This wire provides constant power for the TCM.
Pin 26 Fused Ignition Switch Input (Start-Run) - This is a dark blue with white stripe wire. When you turn on the key to the run or start mode this sends power to the TCM. This will tie into the wire bundle coming out of the TJ PCM on connector 1 pin A2.
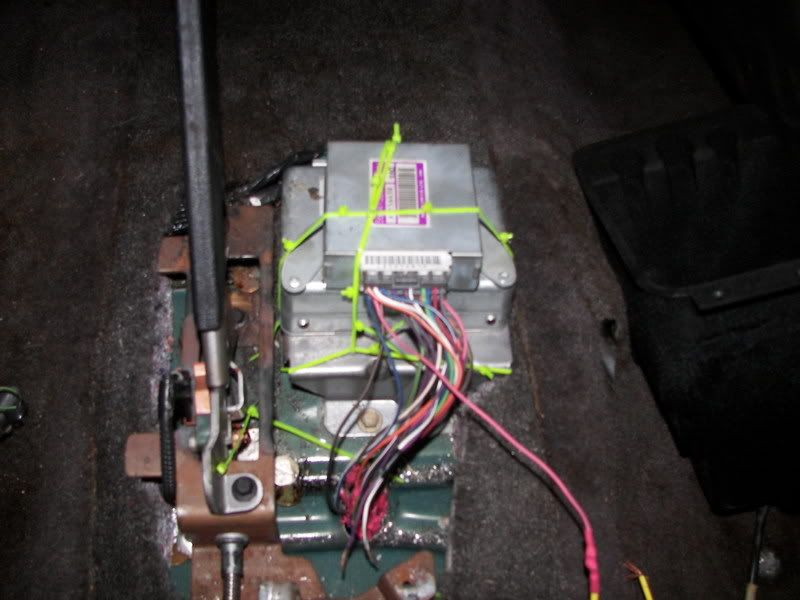
I mounted the TCM under the center console on top of the airbag computer underneath the armrest portion. I drilled a hole underneath where the bin in the arm rest is and ran the wires up along the transmission tunnel, then up the firewall to the PCM. As for the things that I have had to adapt to the ZJ, one is that I had to ground the black with white tracer wire that goes to the pcm (connector A) with a switch so that I could start it. I need to do some work with the NSS to not have to ground this wire as well as get my reverse lamps back. I'll edit this when I figure these very minor issues figured out.
 03-13-2007, 03:05 PM
Good job. Only thing I don't like is I didn't do it first and I didn't even get to help you much haha. I vote move to writeup section.
03-14-2007, 03:13 PM
Originally Posted by TrojanMan

Well lets get your heep running so we can do it! (And then put the aw4 in the jeep).
03-14-2007, 10:42 PM
Help me find a pcm to put in. Let me borrow yours!
 12-13-2007, 09:32 AM
how does it work> does it shift fine and all that? I thought i read somewhere that you were having problems.
12-13-2007, 10:52 AM
Shifts and drove fine, until it blew up at URE. The only issue I had was the CEL was on, and since I have a 96, so I have to have an OBDII scan to pass inspection.
12-13-2007, 02:25 PM
oic, my CELs been on since i bought it over a year ago. Bad/no cat can do that
12-21-2007, 09:22 PM
Ok, I too have a '96 4.0L ZJ that I would like to put an AW4 in but I can only do it if it will not trigger a CEL since I live in California and can't pass smog without it. So here is my idea...
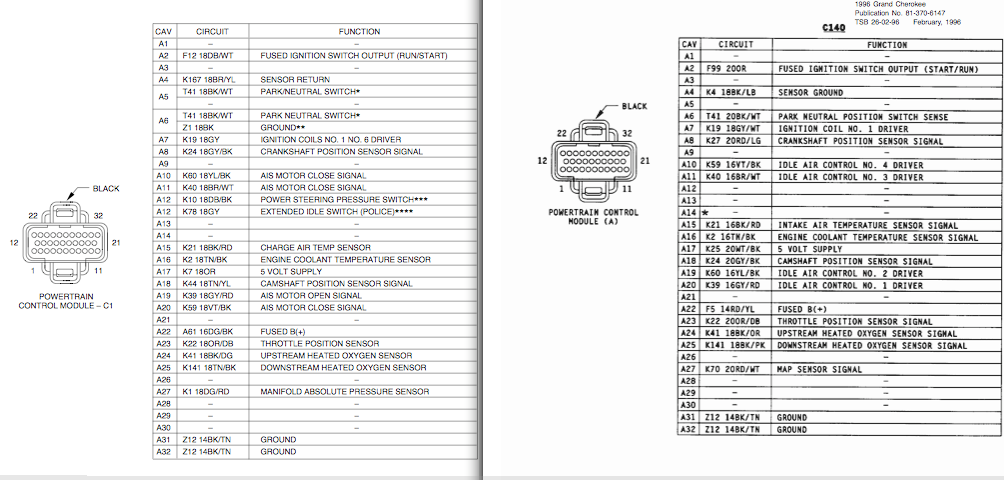
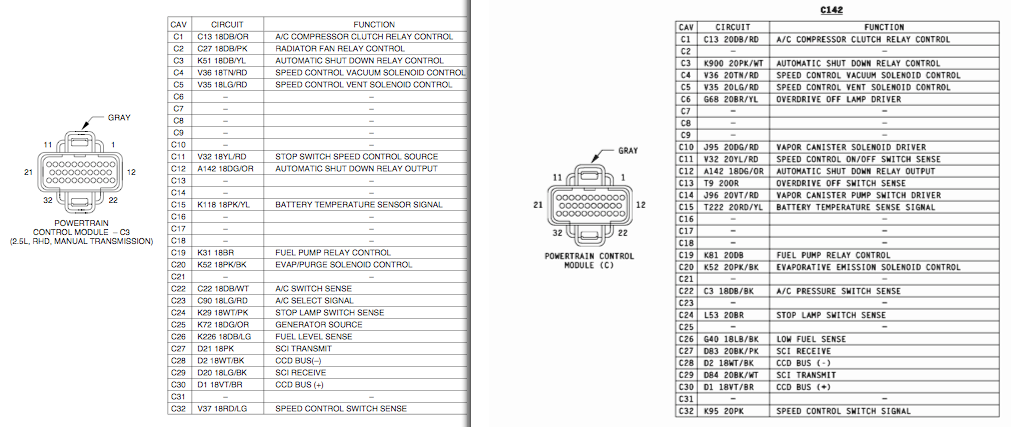
ZJ PCMs control both the engine and transmission, while XJ PCMs only control the motor and thus have a separate TCM for the transmission. I've done a ton of research and am trying to determine if it is possible to put an XJ PCM in a ZJ. I found the pinout diagrams for both and with the exception of the transmission controls the pins line up.
Here is the XJ PCM on the left versus the ZJ PCM on the right.
C1
C2
C3
So I'm thinking swap the PCMs and use the TCM out of the donor jeep, make the necessary pin swaps such as the SCI Transmit/Receive pins on connector C3 and a few others and you'll have a running Jeep without a CEL.
So tell me what do you guys think, any obvious things I'm missing ...
Last edited by downtowncb; 12-22-2007 at 02:40 AM.
12-27-2007, 07:27 PM
Does anyone think this would work?
 12-27-2007, 10:38 PM
the more tech the better! I'm considering doing the AW4 since my 42re is acting up.... if you want to try a pcm swap use one from an EARLY 93 since they could have the AW4 stock in them. I don't know how much that helps if you already have an XJ PCM already
12-28-2007, 05:52 PM
Well I've done a lot more reading and I'm no longer sure if my idea would work. The problem is that the ZJ with all its fancier functions and what not has a whole other computer called the Body Control Module (BCM) that the XJ doesn't. For example in the XJ, A/C controls are sent directly to the ECM, however, in the ZJ, the control functions on the dash are relayed through the CCD Bus by the BCM to the ECM. So the problem is I doubt the XJ ECM would like seeing another computer, possibly triggering a CEL and then we're right back to where we started. If anyone knows more about the CCD protocol, how it works and how modules interact, there input would be much appreciated.
The problem with this is retaining the OBDII functionality. I believe if one were to use a computer older than '96 in a post '96 vehicle the OBDII would be lost and again we would have a problem passing emissions.
12-30-2007, 10:47 PM
so if i didnt care about the CEL (living in florida) i could just literally bolt an AW4 in?
12-30-2007, 11:01 PM
Yes, it is a direct bolt in with no adapters required (just a different driveshaft)
You do have to deal with wiring no matter what, though. It will not plug in.
12-29-2008, 03:09 PM
Sooooo any updates on this? Works great? no problems? Looking to do this on mine in the next week or so. I also need to pass emissions so it looks like I will need to do a little extra work. And thanks for the nice write-up. It's the reason I was shown this site.
 12-29-2008, 10:38 PM
A tip for removing the shifter handle, shift it down into 1st gear and then pull towards you vs up when its in park.
12-30-2008, 09:09 PM
Can anyone tell me how to tell which tranny is in a 93? Can I tell by the Vin on a website or anything? Found a guy parting out a 93 but I want to make sure he has the AW4 instead of the A500? or whatever the other option was. It does back the inline 6.
01-09-2009, 05:23 PM
The aw4 has a pie slice shaped neutral safety switch on the pass side. looks like this. This is how i tell em apart atleast. the 42re/a500 (same thing) were the other option in 93. I've had both and on the shifter in the cabin a aw4 will go P R N D 3 1-2 and on the 42re it'll be P R D N 2 1. I'm pretty sure at least someone please right me if i'm wrong, i haven't seen the inside of my old jeep in a while
Last edited by cashmier; 01-09-2009 at 05:26 PM.
09-22-2009, 04:52 PM
Hi guys, sorry for digging out this old thread, but it is still usefull!
After doing successfull OBD I swap, I'm going to take the challenge of OBD II. Has anyone found any way to fool the PCM, so that it wouldn't throw CEL?


 05-11-2010, 08:07 PM
"As for the things that I have had to adapt to the ZJ, one is that I had to ground the black with white tracer wire that goes to the pcm (connector A) with a switch so that I could start it. I need to do some work with the NSS to not have to ground this wire as well as get my reverse lamps back. I'll edit this when I figure these very minor issues figured out."
Just curious if you ever got this figured out? thanks
06-07-2010, 12:23 AM
Honestly I blew up the aw4 at URE 4 years ago and have since put a 42re back into it. Since then, I've driven it maybe 50 miles total. The 42re I bought for it needs a rebuild as it was used prior to me. Since then it's been a home for mud wasps and cob webs.
 06-07-2010, 01:25 AM
there were actually a few different options in 93
the 42re i think was in the 4.0
My ZJ is an early 93 ZJ ( buid date of October or November of 92 ) and i have the 46RH tranny .... which is also a very good tranny... never heard anyone ever complain about it and i definitely dont have any complaints. 170k miles and still runnin strong and shifts very firm
the 46RH also goes P R N D 2 1
Last edited by 93ZeeJ; 06-07-2010 at 01:28 AM.
| « Previous Thread | Next Thread » |
| Thread Information |
Users Browsing this ThreadThere are currently 1 users browsing this thread. (0 members and 1 guests) |